September 2018
How to deal with fast heating Android phones

Android smartphones are the same as computers, have components of CPU, GPU, RAM, Input and output, only in the form of mobile. However, there are simple things that distinguish computers from smartphones, namely how to dissipate heat from hardware work.

If the computer can use a fan or fan, but not on an Android smartphone. This is an obstacle why Android phones quickly heat when used. Whether it's only used for social media, playing games, or other.

In addition to being influenced by the design and some of the Android SoC hardware, the cause of Android's fast heat can also be caused by the behavior of its users, what are they?

we will discuss in full about the causes of hot smartphones, what causes and what solutions to overcome the hot fast android.

Causes Android phones to heat up quickly


As mentioned above, the cause of Android is quickly hot in some cases is caused by the Android hardware. Not only blame Android phones with low prices, android with a middle price and even more that experience heat fast.

If you play games or do activities that require hard work from the GPU or CPU, because these two components are in a single chip, it is called a system on chip (SoC). Then it will cause heat components, because it takes more battery power.

Android smartphones become warm not a big deal, because they have been designed like that. However, if it feels hot quickly, you must pay attention to what the cause.

The CPU Snapdragon series that causes the cellphone to heat up quickly


In general, the CPU or SoC on the Android smartphone has been designed as well as possible and optimized for performance, and the incidence of fast hot Android phones is rarely found.

The SoC manufacturer is already designed to be able to handle excess heat. So when the Android phone is approaching the heat limit, the CPU will reduce the speed of its work, and in some cases it will display a notification to cool it down before using it again.

One example of bad hardware optimization, namely Snapdragon 810. Is a Flag Flag in 2015, which has been rumored from the start to experience the problem of heat-fasting.

This SoC accelerates processing speed to anticipate overheating, but causes Android performance to be slower.

Be careful, the cell phone is hot quickly, it can damage your cell for a long time


Not only is it annoying when held by the hand, a cell phone that is hot fast can also reduce the life of your HP components, what components can be damaged? See below.

Quickly damaged or leaky HP battery


Android smartphones that use Lithium ion type batteries (Li-ion), often leak or damage, this is caused by heat on the cellphone.

Although Li-ion batteries have a higher energy density than Li-Po batteries.

This type of battery has heat-sensitive weaknesses, makes the cell battery oxidized and shrinks the power capacity, even shortening the battery life

SoC Damaged until Cellphone Dead


Although rare, if the HP is hot too long it can cause physical damage to the HP chip. As a result, the HP turns off suddenly and cannot be turned on again.

Effective Solution to Overcome Fast Cellphones Hot


#1. Avoid charging overnight


We've all done it, so in the morning the HP battery is full. However, as explained above, heat is the main enemy of Lithium ion type batteries.

So to avoid overheating, try to charge HP without a protective case and place it in a hard place that absorbs heat, avoid putting it on the sofa or mattress.

#2. Avoid heat from the sun


Besides being caused by the cellphone itself, heat can also be caused from the surrounding environment. For example, using a cellphone for too long in broad daylight.

In addition, using the cellphone in the sun also requires that we increase the brightness of the screen (brightness), which has excessive heat on the battery.

#3. Don't Play Games When you are charging


Using a cellphone when it's charged is okay, it's only limited to chatingan, social media, etc. that don't require hard HP performance.

But if it is used to play games, both the CPU and GPU will work hard to make heat, plus being pressed, the impact of excessive heat on the cellphone

#4. Manage battery draining applications


To deal with fast heat, make sure you use the application as needed. Like using GPS only when needed, turn off Bluetooth or wifi when not in use, and don't watch movies or youtube for too long.

#5. Don't use a KW or different amperage charger


The cause of heat is also often due to charging using Charger KW. Generally, KW or fake chargers use cheap components and are below specifications, and chargers with different amperage inputs can also cause HP to heat up quickly

#6. Cool the cellphone when playing games too long


Playing games for a while has made the cellphone hot, especially for too long. But calm does not need AFK or get out of the Game to cool the HP.

The trick is easy and simple, you just need to remove the case, and put the cellphone on the floor or glass table temporarily.

Thus posting about the causes and ways to deal with Android phones heat fast, it can be concluded that in addition to disturbing when on the hand, the cell phone that is hot fast also has the potential to damage the HP. All the tips above can be useful. thanks.
How to Backup Xiaomi Smartphone Data

Coming as a newcomer by bringing powerful low-cost devices, the company Xiaomi managed to tear apart the mobile market in various regions, including Pakistan.

This Chinese company has quite a lot of cellphones that are quite popular with various kinds of people, from the lower class to the upper class.

With low prices and mobile phones that are always refreshed every time, not infrequently many people often change phones to use newer devices.

For that reason, making backups of data from old phones to be transferred to newer phones is needed. In addition, by backing up the data, the Mi Fans do not need to fear the data is destroyed when the cellphone is damaged or lost.

Backup Xiaomi Data Locally


By carrying out its flagship MIUI system, devices made by Xiaomi usually come with additional utilities, including local backup support in this case.

In some versions, you can find this data backup feature in Settings> Additional Settings> Backup & reset. Furthermore, the backup data can be found in the storage memory, precisely in the MIUI folder > Backup> All backup.

Xiaomi Data Backup With Mi Cloud


Besides being locally, you can also back up data from Xiaomi devices online to the cloud service it owns, the Mi Cloud. Even in this way, you can reduce the memory in the device that you are using by deleting the local data.

You can use this backup feature via Settings> Mi Account, and turn on all the synchronization settings, from contacts, sms, photos, videos, and so on.

Xiaomi Data Backup With PC


You can also back up data from a Xiaomi device to a PC (Personal Computer) or laptop. In this case you can use Mi PC Suite which you can download via the following page .

You can use it by connecting the device using a data cable to the computer after successfully installing and opening the Mi PC Suite application.

Xiaomi Data Backup With Third Party Services


In addition to using some of the original services and features of Xiaomi companies, you can also use third-party services, such as Microsoft OneDrive, Dropbox, 4 Shared or other services.

You can also use services made by Google, through Settings> Sync> Add> Google, which in fact you can also use directly on almost all devices that use the Android operating system.
How to Overcome Code Play Store Error

Usually this error appears when we want to download the application we want, almost everyone has experienced an error code when downloading an application on the Play Store . If you are one of them you don't need to worry, because here I will discuss the error codes one by one and how to overcome them.

How to Overcome Code Play Store Error


If you are downloading an application or game and this code appears, of course you will feel upset. How come? You have tried several times but still the Error Code still appears, even though you have rebooted your Smartphone.


Error Code 194


This error is very common in Smartphone users, the way to overcome it is very easy.

  1. Enter settings, then to Applications.
  2. Search for the Play Store Application.
  3. Open App Details then press Force Stop (This serves to force the Play Store to close)
  4. After that you Clear the Data Play Store.

After you have done the above method, you have to do it again the same way on Google Play Service. If you still can't, you just need to Install Google Play Store with the new version.

Error Code 504


  1. Please enter Settings / Settings.
  2. After that, go to the Application / Apps.
  3. Select All.
  4. Next you search Google Play Store.
  5. Select Clear Cache and Clear Data.
  6. You need to do the above method for the Google Services Framework.


Error Processing Purchase DF-BPA-09 Error Code


How to solve the Error Code that is very easy, because unlike the two Error Codes above, you only need to Clear Data on the Google Services Framework

  1. Enter Settings.
  2. Select the Application / App Manager menu.
  3. Search for Google Services Framework.
  4. After that you Clear Data.


Error Code 495


How to resolve the Error Code which is the same as the one above but there are several different things, here we are not only related to Google Services Framework but with Google Account and Google Play Store itself.

  1. Enter Settings.
  2. Select the Application / App Manager menu.
  3. Search for the Google Play Store.
  4. After that you Clear Data.

Do the same way on Google Services Framework, after you do Clear Data on Google Play Store and Google Services Framewok. Next you do this:

  1. Enter Settings.
  2. After that, choose Account.
  3. Then delete your Google Account.
  4. Next you Reboot your Smartphone.
  5. If so, re-enter your Google Account by going to Settings> Accounts> Add Account> Google Account.


Error Code 941


As usual, the way to solve the Error Code is very easy, no exception to this Error Code 941.

  1. Enter Settings.
  2. Select the Application / App Manager menu.
  3. Search for the Google Play Store.
  4. After that you Clear Cache and Clear Data.
  5. Then you come back, then look for the Application Download Manager in our Application Manager, After that you Clear Cache and Clear Data.


Error Code 491


The fix is ​​very easy:

  1. Remove Google Account from your Device.
  2. After that you reboot your device.
  3. If it has been rebooted, you re-enter your Google Account.
  4. Enter Settings> Apps> Google Service.
  5. Finally you Clear Data and Force Stop.


Error Code 498


The cause of Error Code 498 is Interrupt while Downloading on the Play Store. Usually this is caused by the cache on the device is full, the only way is to:

  1. Delete all applications and files that are not used
  2. Then you turn off your device
  3. After that you enter into recovery mode by pressing Volume Down + Power + Home simultaneously.


Error Code 919


The thing caused by this Error Code is that we can download the application on the Play Store but cannot open it. Usually this happens because there is no more empty space on our device, the way to deal with it is very easy. You just need to delete the application that is rarely used and is not used.

This is How to Cope with Code Play Store Error , Actually there are still many Error Codes that I will discuss next.
How to Overcome Bad Sector on Hard Drive

The word Bad Sector may not sound foreign to some people who are in daily contact with computers. What is Bad Sector? Bad Sector is a sign that states that there is a certain part of the hardware that has been damaged so that it can no longer be used.

Bad Sector on the hard drive that often haunts people who are closely related to computers everyday, even though Bad Sector is a very common thing on computers.

What Causes Bad Sector?


The thing that often happens is that the connection is lost when transferring files, or also because it is caused by a sudden shock on the hard drive that causes the Haddisk disk to get scratches. But besides those two, there are several other factors that cause Bad Sector including:

  • Unstable Electricity, for example, drops suddenly when Haddisk does his job.
  • Shutdown by improper means is also one of the causes of Bad Sector.
  • Poor Product Quality.
  • Support Hardware that is too old for example a Processor Fan that is not working properly or a Hard Drive that is too hot.
  • Malware.

The cause of Bad Sector in general is the weakening of the magnetic disk on the hard drive which results in mechanical errors. The arrangement of files on an irregular hard drive makes the head unable to read the sequence of files needed by the software, causing the head to swipe the hard drive plater and cause Badsector.

How to fix Bad Sector?


In the Windows Operating System there are features / tools default from Windows named "Chkdsk" whose function is to find an error on the hard disk disk after it will be corrected. Logical error, besides that Chkdsk can detect and mark Bad Sector, so the Windows operating system no longer uses it.

To enter into this tool itself is very easy, you just need to:


  1. Enter My Computer, After that you Right-click which partition you want to check for, for example C, D, or E.
  2. After that the menu will appear. Please select Properties.
  3. Then the Properties dialog box will appear, Above there is a Menu you can choose Tools to enter into Chkdsk Tools.
  4. There you will see the writing Check, the one beside it is the shield logo.
  5. Click Check.


Advanced if found Bad Sector, you can fix it the way above but you must choose the "Repair" option. In addition you can also add a Fisk Defragmenter through the "Optimize and defragment drive" menu , this is to rearrange the files that are on the hard drive to become organized.
How to Fix an Unreadable SD Card

MMC or better known as Memory Card (Memory Card) or SD Card is one of the external storage media on your Smartphone. By using SD Card we can store more files like Music, Video, Photos, and so on. Seeing the rapid development of technology, I think SD Card is rarely used anymore, considering that many Smartphone Vendors now offer such large internal storage.

But sometimes when we need an SD Card to anticipate losing files, what do you mean? We can save our important files on the SD Card, if there is something unwanted on our Smartphone, for example bootlop, and so on. We will not feel panic because all the important data is already in the SD Card . To Hard Reset our Smartphone, we do not have to bother to backup it first.

How to Repair an Unreadable SD Card


The name of the item is definitely not durable, so is our SD Card. The problem most often experienced by Smartphone Users on SD Card is SD Card which always asks for Format, SD Card is unreadable, and many more. Before that we have to know why the cause of our SD Card is damaged?

  1. Too much moved, This is the main reason for the damage to our SD Card. It could be when we move the SD Card from one device to another device. The Yellow Plate is scratched.
  2. The SD Card is dirty, Do you know if the Yellow Plate on SD Card is dirty, it will cause SD Card not to be read by your Smartphone.
  3. Affected by the Virus, Maybe this is rarely experienced by Smartphone users, but not a few also have experienced problems like this.
  4. Save too many large files, this will cause SD Card to work harder and this can also make SD Card performance decrease.
  5. SD Card quality is not good, Before you decide to buy SD Card you should know the quality of SD Card from each vendor.


After we know the way, we can anticipate the damage to the SD Card by not moving the SD Card, Always cleaning the yellow SD Card, and so on.

1. Eraser


You can clean the Yellow SD Card Plate by using an eraser, Instead you have to format your SD Card which is feared there are important files in it. It is a good idea to try this first. Maybe your SD Card is dirty with dust, oil spills, and so on.

  1. Remove the problematic SD Card from your smartphone, after that you prepare a white eraser.
  2. Rub gently clean the yellow plate on the SD Card.
  3. Make sure you rub it clean, so that your SD Card can be read again.
  4. Finally, you try to insert SD Card into your Smartphone. If it remains unreadable, you can try the second method.


2. Check Error


If the above method doesn't work, we recommend checking the SD Card Error using a Computer or Laptop.

  1. Connect a Smartphone with your computer using a USB cable.
  2. Once connected, you enter MTP (Media Transfer Mode) mode on your smartphone.
  3. Enter Windows Explorer, after that you enter into My Computer, there you will see the drive from your SD card (usually F or H)
  4. Right-click on your SD Card Drive.
  5. Then you select Tools, after that you select Error Checking, Wait until the process is complete.
  6. If you have please click right on your SD Card Drive again then click Eject.
  7. Lastly you checked on your Smartphone, has it been read or not? If we haven't used it the next way.


3. Settings


If you decide to format your SD Card, you should use this method first.

  1. Connect your SD Card with a computer using a card reader
  2. Once connected you click Properties.
  3. Select Tools> Folder Options> View> Show Hidden File And Folders.
  4. After that you remove the check mark in 'hide extensions for known file types'' and '' protected protected operating system file (recommended) ''.
  5. After that click Ok.


If you tried the above method, it might be the only way to save your SD Card by formatting it. If you don't want to lose the data, you can search for backup tutorials on the SD Card.
How to Overcome Bootloop on iPhone

As stated in the previous article that the iPhone has become the dream of the Young People, this can be seen when the Young People hold the iPhone surely their beliefs will rise dramatically. It is undeniable that the iPhone is still a king in the world of gadgets. It is the sophistication of the iPhone that makes it expensive, and can only be enjoyed by middle to upper class people.

No exception to this iPhone, Surely every thing that is created by man has a deficiency, whether in any way it will have a drawback. The thing that often happens to the iPhone is the iPhone that has Bootloop.

How to Overcome Bootloop on iPhone


Sometimes this happens because the Application Installation or Tweak from Cydia doesn't match the iOS version of your device. Bootloop also often occurs because of the many applications or themes installed on your device. Not only that, Hardware Failure can also cause Bootloop.

#1. Hard Reset


Jailbreak IPhone does help you to install various applications, but the more downloads you get, the more likely your iPhone will experience Bootloop, the easiest way you can do is by Hard Reset, the following:

  1. You press the HOME + POWER button simultaneously for a few seconds.
  2. When the device performs the Boot Process, you immediately press and hold the Volume Up button. Then you will be directed to Springboard, then open Cydia.
  3. Then all you have to do is recall what application you installed before your iPhone experienced Bootloop, if you already remember you have to delete the application.
  4. If it's been deleted, please Reboot your iPhone. If you enter the Home Screen, this means it works.

#2. Restore iOS


If the first way does not make your iPhone out of Bootloop, you can use this second method. It's just that you need ITunes and a Computer to do this second way.

  1. Press HOME and POWER simultaneously until the iPhone turns off.
  2. After that you connect the iPhone with a Computer using USB and Run ITunes.
  3. Position your iPhone into DFU (Device Firmware Update) by pressing the HOME + POWER button simultaneously for a few seconds. After that, you release the POWER Button, but don't release the HOME button first. After a few more seconds, you release the HOME button.
  4. You will see the message displayed by iTunes if this method works, and automatically iTunes will process your iPhone Restore to Default.
  5. If Restore is complete, your iPhone will automatically reboot.

#3. Charge the iPhone Battery


What people often do is charge the battery while still playing the Smartphone or iPhone, whereas if you are charging the Smartphone or iPhone must be Off.

As we know, the iPhone will automatically turn on if we connect the charger to off. If the iPhone Hardware system is normal, eating when connected with your iOS charger will live.

#4. Third Party Tools


We can use Third Party Tools to solve Bootloop problems on IPhone, the tools that are widely used are iMyFone D-Back.

  1. Please download and install iMyFone D-Back on your computer.
  2. Run the Tools, Select "Fix iOS System" after that, select the option from the required mode.
  3. The next step you need to connect your iPhone with your computer, after that you can follow the instructions.
  4. This tool will look for the Paker that matches your iPhone firmware, then you click the download button, this process will take several minutes.
  5. If you have downloaded and verified the Firmware package, this tool will automatically start the repair process.


Those are some ways to overcome Bootloop on iPhone , good luck.

The Protected View feature is a feature found in Microsoft Office 2010. This feature itself is useful for securing document files by limiting editing of the file. Not a few people who are actually damaged by this feature, especially now that many people are downloading documents from the internet.

The background of the development of this feature is the rise of computer viruses that threaten the operation of Windows-based systems, this platform is the target of hackers to launch their actions. Not only that, the applications contained in the Windows Operating System also become targets on hackers.

This MS Office Protected View feature will prevent users from opening MS Office Documents obtained from the internet.

Then how to disable, to disable this feature is very easy.

#1: First run Microsoft Word 2010. After the MS Word window opens, click the File menu in the upper left and then select Options. Later the Word Options dialog box will appear, on the left side of the list, select Trust Center, after you select it, please click Trust Center Settings.

#2: The Trust Center dialog box will appear, on the left click Protected View.

#3: Remove the check mark on this option:
  • Enable Protected View for files originating from the Internet
  • Enable Protected View for files located in potentially unsafe locations
  • Enable Protected View for Outlook attachments

#4: After that press Ok.

This method can also be used to deactivate Protected View in Excel 2010 and PowerPoint 2010. If this feature has been disabled you can open documents that you downloaded from various sources, and when the document opens it is in an editing mode.
How to Activate Location Services on iPhone

When you first install the application on the device, you will sometimes be asked to set certain access permissions, so that the application can run properly.

In this case, you can choose Allow to make the application run and access various information from the device. Or, you can choose Don't Allow if you don't want your information to be accessed by the application.

You also need to do this when installing applications on the iPhone device . And one of the access that is usually requested is access to information from Location Services.

Well for those of you who don't know how to activate Location Services on an iPhone device, you can follow the steps in the review on how to activate the following.

How to Activate Location Services on iPhone


To enable location settings on iPhone devices, you only need to enter Settings, then Privacy, and enter Location Services. Next, you can activate the Location Services slider button to the live position.

In addition, through this Location Services settings menu, you can also set location access for each application. For this, you can scroll the screen down and tap the application that will be set to access the location.

There are three types of location access options that can be selected in this case. These three options include the Never, option When Using the App, and the Always. Never

Option can be selected for those of you who want to prevent access to information to Location Services that are carried out by certain applications installed on your device.

Options When Using the App can be selected for those of you who want to allow certain applications, which are running or using the features on the screen, to be able to access information from Location Services.

Options You can always choose for those of you who will allow certain applications to be able to access information from Location Services, both when the application is running on the screen and when walking behind the screen.

Keep in mind, because Location Services information includes personal data that should not be distributed arbitrarily, you must be careful in arranging permission to access the Location Services mentioned above.
How to not be seen online on Instagram

Usually many people interact every day on Instagram, either uploading new photos on the timeline, video calls, making stories, and chatting. But sometimes people who do n't want to be seen while online on Instagram can use social media without interference.

For example, there are often other Instagram users who chat during working hours so it is very annoying. Surely you want the activity itself on Instagram is unknown to other users.

For that, you can use the feature on Instagram so that it is not found online. For that, for those of you who are curious about how to not know online on Instagram, you can see the tutorial as follows.

How to not be seen online on Instagram


  • First, you can open the Instagram application on a smartphone
  • On the Profile page, you can choose a menu with a three-point icon at the top right
  • In the Settings page, you can choose Activity Status
  • Next, you can turn off or deactivate the Show Activity Status menu
  • After the menu is inactive, your active symbol on Direct Message will not be seen by friends or other Instagram users.
  • Unfortunately Instagram itself has warned that if the Show Activity Status menu is turned off then automatically you also cannot see the active or inactive status of other users.

You could say this one feature is perfect for those of you who don't want to be disturbed by others when using Instagram. But I myself don't really care if I or someone else is online because the messages, comments, and likes that we provide are definitely entered into the notification so they will definitely be read.

Later this online status will be active if we are opening the Instagram application and providing a green circle next to the profile photo. But if you leave Instagram, this status will automatically disappear. You could say people still receive our messages even though they are not online because they get notifications on Instagram.

At first glance, Instagram itself has managed to become one of the most successful social networks in the world with more than 1 billion users. In addition, the innovations he made were always interesting to wait for.

In addition to capturing photo moments on social media, Instagram users can now also make short videos on Story, upload videos for up to 10 minutes on IGTV, and Video Call. Of course, Instagram is a social networking application that is calculated for now.
How to copy text that cannot be copied on Android

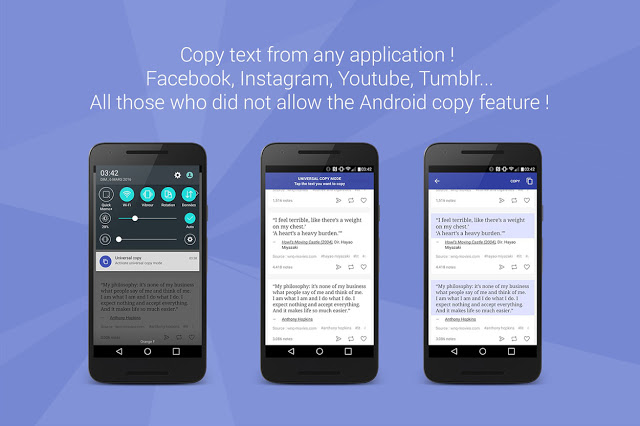
Sometimes we want to copy sentences or text in an application on Android. However, not all applications allow this. An example is Instagram. We cannot copy captions, comments and some other text in the short photo and video sharing application.

But calm down, there is always a solution for every problem. One way is to use an application called Universal Copy.

Just as the name suggests, with this application we can copy text that is anywhere on Android.

Even though the text cannot actually be copied.

If you are interested, you can follow the method below.

#1: Download the Universal Copy application first on the Google Play Store. Free of charge

#2: If Universal Copy has been installed on your smartphone, immediately open the application. Then activate it by sliding the top slider.


#3: Now you will see there is a Universal Copy menu in the notification bar. Touch the menu if you want to copy a text on Android but can't copy it. In this example I will copy sentences on Instagram (in the normal way, we can't copy Instagram captions).

#4: After the Universal Copy menu is clicked, you will see a blue (or purple) frame around the screen. Then touch the text or sentence you want to copy, if you just touch the copy logo in the upper right corner.

#5: Finish. Now you can copy the sentence to Microsoft Word, WhatsApp, SMS, or Email.

So, if you want to copy sentences from applications that can't copy the text, you can use Universal Copy.

That way you don't have to type it manually just to copy.
How to disable Instagram accounts for a while

Since Facebook bought the Instagram application , Instagram's popularity has skyrocketed. You are certainly no stranger to this one application. Especially now that this video photo sharing application is quite popular on smartphone platforms, especially among the younger generation.

Yup, Instagram is equipped with interesting features like instory, and makes people want to linger to use this application. Besides being used to share photos, videos, chats, etc.

Instagram is also often used to find fame, seek recognition of others (?), Media promotions, search for up-to-date news and various other features, which makes users feel at home using Instagram.

Not everyone feels positive from Instagram


From the sophistication of the features offered on Instagram, there are some people who even want to delete their personal Instagram account. Many reasons why the person, including me, chose to deactivate the Instagram account.

From my point of view, Instagram is not what it used to be, which is only limited to sharing photo or video platforms. In the past, most users chose when they wanted to upload photos / videos to Instagram.

Ensure that only the best photos / videos will be uploaded on the Instagram feed. Since instastory features appeared, Instagram changed dramatically. Almost all of my friends use instastory to show off, update important things or not at all times.

Other ways, maybe it could be because they want to create a new account or maintain their privacy. There are some people who just want to temporarily publish their Instagram accounts, but not a few people want to permanently disable Instagram.

How to Temporary disable Instagram account


For those of you who want to disable an Instagram account, both temporary and permanent, here is how to disable Instagram quickly and easily, which you can try.

#1: Temporarily disable Instagram accounts


Instagram accounts are temporarily disabled, allowing you to hide your Instagram account completely. As if your IG account has been deleted.

In fact, your account is only temporarily disabled, and you can activate it again at a time.


  1. The first step you have to visit the Instagram.com page in the browser contained in your phone.
  2. Before you enter the Instagram view, you must first enter your Instagram account username and password in the available column.
  3. Next, select the profile page by pressing the icon in the menu bar below. This menu is located in the lower right corner.
  4. After entering the profile view and select edit profile.
  5. Then, scroll down and click on the Temporarily Disable My Account menu usually in blue.
  6. After entering the new page, don't forget to choose the reason to deactivate temporary Instagram. Then enter your account password again. Automatically the Temporarily Disable Accound button will activate itself.
  7. Then click the Yes button to continue the next command.
  8. You will automatically exit your Instagram account. If you want to reactivate the Instagram account again, you must open it first through the browser.

#2: Disabling Permanent Instagram Account


This method is used only if you want to permanently delete an Instagram account. You cannot restore or reactivate it as in a temporary disable method


  1. As well as deactivating a temporary Instagram account, you also have to login to the Instagram account that was opened in the browser that was on your cellphone.
  2. Then you will be faced with the Delete Your Account page , then select your reason for deleting this account, then enter your Instagram account password again.
  3. After you have finished entering your Instagram account password, then click the Permanently delete my account button usually given a red color.
  4. To continue the command, press the OK button to delete your instagaram account.
  5. If you want to try entering again to the Instagram account that you deleted earlier, a notification will usually appear which is usually red.

That's how to disable Instagram accounts that can be done in two ways, temporarily and permanently. But keep in mind, before you delete your Instagram account permanently think again and again to do it.

Conclusion


Deactivating Instagram temporarily will make you unable to open your account for just a few days, whereas if you want to delete your account permanently, you will lose your Instagram account.

Along with photos and videos that you have uploaded, and even worse your username and email cannot be used to create a new Instagram account. So to delete it permanently you need to think about it again. May be useful.
How to Add Gesture Features on a Smartphone

Gesture is a feature where when you wipe the screen, it will immediately open a particular application without touching the application icon. Gesture functions similar to a shortcut if on a PC. With the gesture feature, of course you can be faster in opening applications, especially favorite applications that you use often.

Well, to get this kind of gesture feature, you can use an application launcher named Nova Launcher Prime.

The following is the complete tutorial.

#1: You need a special launcher named Nova Launcher Prime, please download it on the Google Play Store.

#2: If it has been downloaded, make sure you use Nova Launcher as the main launcher. The trick is to touch the home button, then select Nova Launcher. Then select the Settings menu


#3: Then select the "Gesture & inputs" menu, then scroll down and set the action to be opened from each gesture. There are swipe ups, swipe down, double tap, and others.


#4: Following is an example of a swipe up gesture, you can choose to open an application or game.


Finished. Please set each gesture to your liking.

Now each time you move the screen up, down, left or the other will open a certain application according to the one you selected in the settings above.
How to Connect a Twitter Account to a Facebook Profile

Now, you can easily connect a Twitter account with a Facebook profile to make it easier for you in many ways, including to make the same post on each platform.

As we know, in contrast to Instagram and WhatsApp services, Twitter is a social media service that is not one-stop with Facebook.

Even so, you can still connect or link accounts from each of these social media services very easily, that is, you only need to enter the Twitter account that you have.

But now, this feature is unfortunately not available anymore due to data abuse cases that had hit Facebook some time ago. Facebook has updated its Platform Policy which ends the automatic ability to make posts from tweets to Facebook profiles.

The Tekno Match team does not yet know whether this will last forever or temporarily. But just in case anyone knows Facebook changes their mind again, you can connect your Twitter account with Facebook profiles by following the steps we reviewed below.

How to Connect a Twitter Account to a Facebook Profile


  • To connect a Twitter account with a Facebook profile you need a browser on the computer
  • First of all, you can open a Twitter account that will be linked through a computer browser
  • After opening, enter Settings, then select the Applications tab
  • On the page, you can choose the Connect to Facebook option
  • In this case, if you have not entered Facebook, you will be asked to enter credentials (username and password) then select the Enter button
  • After that, Twitter will remind you that it will access some information on Facebook, and to continue you just need to press the Continue button as your Facebook Name.
  • Next, you can manage anyone who can see Tweets and Retweets that will be shared on Facebook
  • When you have finished setting it up, you can choose the OK button

Well, it's quite easy not to connect a Twitter account with a Facebook profile. Now, we are just waiting for the policy from Facebook. Hopefully this giant platform will reopen access to Twitter in its policies.
How to use Samsung DeX

Along with the release of Samsung Galaxy S8 and Galaxy S8 + devices, Samsung also introduced new devices that were named with Samsung DeX Station as additional equipment.

By using these additional equipment, users of Samsung's latest flagship devices can optimize their productivity through new experiences like working using a desktop or computer.

Technically, the Samsung DeX Station is a dock for computers that are equipped with several types of ports such as Ethernet ports, HDMI ports, USB 2.0 ports, and USB Type-C ports.

To use this dock, Samsung has also equipped its flagship devices with Samsung DeX to provide a better desktop experience.

What Is Samsung DeX?

How to use Samsung DeX

Samsung DeX is an ecosystem made by Samsung that will allow some of its mobile devices to change like desktops or computers.

Or simply, you can now connect several series of Samsung mobile devices to computer equipment, such as monitors, keyboards and mice.

This way, you can do things more easily, such as processing documents, sending e-mails, multitasking, copying text between applications, and several other things.

Unfortunately, until this article was released, only Samsung's flagship devices support this. Even then, Samsung Galaxy S8, S8 +, Note 8, S9 and S9 +.

How to use Samsung DeX

How to use Samsung DeX

To enjoy the desktop experience of Samsung's flagship phones, you only need to have a Samsung DeX Station, monitor, keyboard, and mouse, which is definitely sold separately from the device.

If you already have some of these accessories, you just need to install a Samsung smartphone into the USB Type-C port on the top of Samsung DeX Station.

After that, you can connect the Samsung DeX Station with a monitor using an HDMI port and cable, as well as a keyboard and mouse via a USB 2.0 port.

Automatically, the display of a smartphone device will appear on the monitor, with some adjustments, not just the area, but actually changing like a desktop or computer display.

Even not only the display interface of the device, but the interface of some applications will also change, as in the Microsoft Office application.

Therefore, some applications have separate provisions for this, such as Microsoft Office which requires users to buy licenses, as well as Microsoft Word and PowerPoint which require additional downloads.

It is undeniable that Samsung is a brand of mobile phones or cellphones that are very popular in the world. This Samsung-owned vendor is still the ideal Android phone in the country.

Many people who want to reset, or factory reset on the Samsung mobile phone , with the aim of wanting to restore the performance of the Samsung HP. To be like in the initial position when first purchased.

Factory reset is usually used to repair an Android system on a damaged cellphone or tablet. Keep in mind if you reset the Samsung phone in the normal way, then all data on the cellphone will be lost.

The important thing is before resetting the Samsung cellphone


There is a good idea to backup the data that you think is important that is stored on you. Because usually, if you reset the Samsung phone, all data and applications on your android phone or tablet will be erased.

After backing up your HP data, then you can reset it without fear of losing important data.

How to Reset Samsung Mobile Phones Without Losing Data


Please note, if the reason you do a factory reset the HP is to fix a trivial problem. It's good to try to find a solution first, if it fails, you can try resetting the following:

#1: Through the HP settings menu


  • The first step, you enter the application or select the settings menu on your samsung mobile.
  • Next, scroll down to select the Backup and Reset menu.
  • After the Backup and Reset pages are displayed, select the factory data reset menu on your Android phone.
  • Then select and check back up my data on the factory data page to reset the destination so that the data that you consider important is not deleted.
  • The last step, select factory data reset on your Samsung cellphone.

#2: Through Android recovery mode


  • The first step you have to do is first turn off your samsung cellphone.
  • Then press the volume button at the bottom and home simultaneously on your android phone.
  • Then press the power button to combine with the bottom volume and home.
  • Hold the three combination buttons for about 4-10 seconds, then release the power cord until it enters the Recovery menu.
  • To navigate directions on the recovery display menu you can use the volume buttons on your samsung cell, both the top and bottom.
  • For a while the function of the power button to confirm the menu.
  • Then select the wipe data or factory reset menu and then conform by pressing the power button on your cellphone.
  • Then, select Yes and click the Delete All Data button
  • Wait until the factory reset processor finishes resetting your Samsung cellphone.
  • Your last step is to just choose the home menu and reboot the system now to restart your Samsung cellphone.


#3: Using Samsung's secret code


We know that Samsung brand mobiles are famous with vendors and have lots of secret codes. From the Secret Code to Check the Features of Samsung Phones, there is one code that is used to reset the Android phone.

This method is very easy and simple, but I suggest you have to backup all the data that you consider important, on another smartphone or on a laptop.

Because after resetting this cellphone the data and applications on your cellphone will disappear without a trace. The following is how to reset a Samsung phone using a secret code:

The first step you need to enter the menu or phone application or telephone. Then type the secret code *2767*3855# then click the Call button or OK on your samsung cellphone.

Furthermore, your Samsung phone will be reset and the data and applications contained therein will disappear without a trace.

That's a brief review of how to reset a Samsung cellphone that is very easy and you can try it at home.
But keep in mind, once again to reset this phone you must back up the data first. Hopefully useful and good luck.
Secret Code To Check Samsung Mobile Features

Android is very popular among the general public. Besides having many features that spoil us whenever and wherever, Android also has a lot of operating systems from various smartphone vendors.

With the Android OS there are so many benefits you get besides being open source, you can also freely modify it.

But remember, like other electronic devices, your smartphone can also experience a decrease in performance if used continuously.

A glimpse of Samsung's secret code


Samsung is a well-known smartphone company in the world that uses Android OS and is very popular for secret codes.

But there are some secret codes that are used to run various kinds of special commands that are rarely known by Samsung users.

These secret codes are what you can use to find out the condition of a second or used Samsung cellphone. Therefore, before you buy Smarhphone samsung second, here are Samsung's secret codes that you must know.

Register and How to use the secret code on Samsung's HP

Apart from samsung sources, this Samsung HP secret code is also found from the Android forum, by decoding or deciphering passwords from various system files on Samsung mobile phones.

To use this code, you only need to press this code on the phone. Without the need to press the call button, this code will automatically open.

*#06# This code applies to all cellphones, the use of this code for checking devices, cellphone candybars and flip phones is common and any brand can use this code to check the IMEI.

*#0001# This code is used to check the Samsung Galaxy serial number or serial number

*#1234# to check the firmware version of the Android Samsung Galaxy we use.

*#0228# or #8999*228# to see Samsung Galaxy battery information

*#8999*778# to see information on the sim card installed on the Samsung Galaxy

*#1111# see the S/W version

*#8999*837# to see hardware version / Samsung Galaxy hardware version

*#8999*782# to see the date and time

*#9998*523# LCD contrast

*#8999*636# see internal memory capacity

*#8999*638# to view cellular network information

*#8999*289# test ringtone for alarm

#*2286# see Samsung battery data used

*2767*3855# code for resetting Samsung Galaxy

#*2562# This code functions as a restart or resets Samsung Galaxy

*#92782# to find out your Samsung Galaxy model or type

*#2255# code to see the telephone list

*#0000# This code is to reset the language

#*5376# This code works to delete all messages that have Samsung Galaxy phones

*2767*226372# to reset the samsung galaxy camera settings

*2767*2878# Custom Reset

*#8999*377# see the log error on the Samsung Galaxy menu

*#232337# to view bluetooth Mac address

#*2474# this code serves to see the duration Samsung Galaxy Phone Charger

*#*#197328640#*# Code to activate service mode and many are used by technicians or service places, from this code you can easily test Samsung Galaxy devices such as factory tests, debug info, back up, restore etc.

That is a review of Samsung's secret code owned by Samsung. For those of you who want to buy these second Samsung products whatever it is, first learn the secret codes above.

Although classified as a newcomer application because previously only spread locally in China, the Tik Tok application has managed to capture the attention of the Pakistani people. and Worldwide

For those who don't know, Tik Tok is a short video-based social media platform that provides a variety of features, including music and special effects to beautify videos before sharing.

This application is available for free for Both  Android and iPhone users and can be downloaded via the page on the Google Play Store for Android  and iOS from App Store. You only need to use a Google, Facebook, Line, or Instagram account to enter this platform.

But in the meantime, even though this application offers a variety of interesting content to follow, regardless of any reason, some of you must have wanted to delete their Tik Tok account.

Well for those of you who have this desire, you can actually do it as easily as registering an account to the platform. You can follow a few steps below.

As an important note, after deleting an account, you will lose access to the account you have, including videos and in-app purchases that you have done.

How to Permanently Delete a Tik Tok Account


  1. First of all, you only need to visit the Tik Tok account profile page that you want to delete
  2. After that, tap the menu icon in the upper right corner of the page screen
  3. If several options appear, select the Privacy and Settings menu
  4. In the Privacy and Settings page, then select the Privacy and Safety option
  5. If so, select the Delete Account option at the bottom of your own
  6. If a pop-up appears confirming Delete Account, select the Next button
  7. After that, you will automatically be thrown to the Delete Account page which contains an explanation of what happened after deleting Tik Tok
  8. Read and understand the exposure, after that you can press the Continue button if you are ready to accept the risk
  9. If the confirmation appears again, select the Delete Account option

By following the steps above, your account will immediately be deactivated immediately and will not be seen by other accounts. The time needed for this process is 30 days. During these 30 days, you can reactivate the Tik Tok account that you deleted by logging in to the account. But after that, the account you have will be completely permanently deleted.

All chat applications definitely require IDs and usernames in their creation, including the line application. Line is the most popular instant messaging application in 42 countries that applies the use of id as account identity.

Not only used for chattingan and social media, Line messenger can also be used for video calls. This Line application is very popular among teenagers, because various kinds of interesting features are offered.

Like various animated stickers, and other features that make chattingan more exciting and expressive.

Can you change Line ID in the same account?


Sometimes some people want to change their Line ID for several reasons. For example, you want to change the brand name of the job, or just replace it with a better LINE ID.

Keep in mind that Line ID cannot be changed once again to make it. But don't worry, there are still ways to get a new ID Line. The solution, like it or not, must register a new Line.

Or if you want to change your ID for an online store or the like, it's better to use a @ line account. However, for line ID requests @ you have to pay / year.

Here's how to easily change Line ID


Log out of Line


Unlike the Facebook and Twitter applications that can be easily and anytime to log out or exit, Line does not allow it to do that.

If you want to exit this application you must do "clear data" with the consequences of all the chat and history that is on your cellphone will be lost. Here's how to Logout from the Line:


  • The first step you have to enter the settings menu then select Apps and search for the Line application.
  • Then select clear data
  • After that a notification will appear on your mobile screen, then press "OK"

Register a new Line Account


A new display will appear and select Sign Up in the lower right corner.


Enter a new cellphone number


Enter your cellphone number then press the next button. Next you will get an SMS in the form of a verification code that you must enter.

Friendship arrangements


Before you enter your username you should set your friendship settings first.

Enter your username


After you enter the username in your application, then select Register automatically you can use the Line application with the new cellphone number.

  • Press the "Auto Add Friends" button if you don't want your Line ID to add friendship automatically to your friend's cellphone number then just uncheck it.
  • Click the "Allow Others to Add" button if you don't want someone else to save your cellphone number to be added automatically then just delete the check.
  • Then click the back button on your phone.


Create a New ID


You have not received the ID Line automatically even though you have registered. You must make it first:

  • Press on "ID Not Set"
  • You will find "ID Not set" on the next page then press the button again.
  • Enter the ID Line that you want then click the check button.
  • Then the words "This ID can be used" will appear, then press the save button.


Set your new ID


Enter the settings menu located at the top right corner then enter your email address. So a brief review of Tekno match about How to Change ID Line on Android . Enough with the mobile number that is still active to get a verification number to make ID Line without having to change the number on the same cellphone.

iPhone as one of the smartphone families that is popular in the World always seems to have new users who are moving from older types of smartphones.

Many reasons why these users use the iPhone more, one reason may not be far from being merely trendy. The iPhone is different from most smartphones, thanks to the closed nature of the ecosystem so many are not used to using the iPhone as they should.

For those of you who are for the first time using an iPhone-type smartphone it may be a little confusing where the SIM card must be inserted. Different from most smartphones first, you can usually find a SIM card slot along with the battery by opening the back cover.

Well, how to open an iPhone card is actually much easier, but you need help with additional tools. You can use the SIM Ejector that has been provided with a package or a similar object such as a pin or needle.

How to open a SIM card slot on the iPhone


Find the small hole of the SIM card slot on the right side of the iPhone


Plug the hole with a SIM Ejector or pin


Then pull the tray that came out to be able to insert the SIM card.


After the SIM card is installed properly, reinsert the tray into the slot.

Easy isn't it? The method of opening an iPhone card like this will often be found on a smartphone with a unibody design or the battery cannot be removed. Many causes of vendors are now starting to carry the unibody design, one of the reasons is about security so that the components used are truly original.

This is somewhat impractical because you can't just change your SIM card just like that if you don't have the tool. Even so, it should not interfere at all, unless you often move cards.

In addition to locking the cellphone screen, one of the ways that can be done to secure our privacy is by locking in important applications on Samsung phones that we have.

In this way, you can secure various things, especially content such as photos or videos, and secret conversations in the messaging application.

To support this, various smartphone developer vendors have equipped the system and interface of the device with the app locking feature (App Lock).

But of course, each mobile developer vendor has a method that can be used differently, because usually the phones carry different interfaces or operating system versions.

Well, for you Samsung device users, you can also use the App Lock feature for your device. For how, you can listen to the steps below.

How to Lock Applications on Samsung Phones


  • First of all, you can enter Settings on the Samsung device that you have.
  • Next, look for the Advanced Features option , then enter the option.
  • After being on the Advanced Features page, then select the App Lock option,
  • In the App Lock menu, you can activate the slider button in the upper right corner of the screen. Automatically, you will be asked to choose the security method that will be used, from pattern, pin, password, to fingerprint if your device supports the sensor.
  • In this case, you can choose one of the methods that you think is appropriate.
  • If you have finished setting up the security method, then you can choose what application you want to lock through the application list at the bottom by activating the slider button.


It should be noted, in this case we use a Samsung Galaxy S7 device, which is likely to occur in different ways or features of other types of Samsung phones.

This can happen because of different versions of the Android system or the interface system used. For this, you can further explore Samsung devices that you have if you haven't found the App Lock feature.

As a consideration, on some Samsung devices, the App Lock menu can be found in the Privacy and Safety section under the names Lock and hide apps . And on some devices, this feature carries the name Lock and mask apps.

Although it comes as an image-based social media, Instagram often displays posts that have captions that are interesting enough to be captured or redistributed.

But unfortunately, this is not easy to do, because Instagram does not feature select text and copy-paste features to copy the writings of Instagram captions.

In this case, you can actually use the screenshot feature to save it in the form of an image. However, for those of you who want to copy it in text form, you can follow the steps below.

How to Copy a Caption on Instagram


  • First of all, you can open an Instagram post that you will copy the caption
  • After that, you can open additional options by tapping the three-point icon located in the top right corner of the post
  • If several options appear, you can choose the Copy Link option to copy the URL address of the post After successfully copying the URL, moving to the browser application that is your mainstay, in this case I prefer to use Google Chrome
  • Paste the URL address that was successfully copied into the provided column followed by pressing the enter button
  • Posts and captions and comments will be displayed on the page, in this case if you are asked to log in, you can ignore it
  • After that, you select the Caption that is displayed by pressing a few moments of the writing until the select text appears (two needle icons)
  • You can move the needle to determine which part you want to copy
  • When finished, release the needle and select the COPY option if it appears
  • If not, you can repeat it to choose which part of the caption to copy

Up to this step, you can now copy the caption from Instagram posts. Furthermore, you can wisely utilize the results of the copy.

You can use the results of the copy of the Instagram caption by using the paste or paste feature that is on your device on some other applications.

Suppose you want to use a caption to upload Instagram posts, you can make uploads as usual. But when filling in the caption, you can press a few moments in the column provided to bring up the PASTE option.

After that, you can choose the option, and upload Instagram posts as usual. But it should be noted, if the caption belongs to someone else, you should ask permission to distribute it again.

In addition, you can save the caption in other text editor applications, in almost the same way, which is to hold a tap on the screen until the PASTE option appears and select that option.


Many make smartphones a combat tool to capture moments. Unfortunately sometimes intentionally or unintentionally the photo is erased.

Relax, smartphone technology today is able to dig back internal cache memory, and most likely can restore deleted photos on Android.
For those of you who like photo hunting or selfie using an Android phone camera. It must always want the moment the photo is stored safely on HP storage.

Causes of photos deleted on android


Errors that cause photos to be deleted are not always caused by human error, because these errors are often caused by the HP hardware itself.
Like a slammed cellphone that makes memory damaged, or errors caused by applications on Android.
Don't want the moment your photo is erased isn't it? The solution is one, namely backup. Backup your important photos on your mobile, and move them to online storage like Gdrive, OneDrive, or you can move them to PC.

What if this happened?


Photos in my gallery were accidentally deleted, can I restore deleted photos on Android phones? The answer is between yes and no.

Does Recover deleted photos on Android have to Root?


When it comes to the Android system, there must always be questions like this.

Must be root or without root?


If your Android phone is rooted, it's even better. Because the application will more optimally find deleted photos on the android system. But if your Android phone is never rooted, it doesn't matter.
You can still restore deleted photos on Android without root, even though it's not as good as the rooted cellphone.

How to Recover Deleted Photos on Android


If your case is like that, don't worry if you want your photo back. There are several ways to restore photos that were accidentally erased on your cellphone.
Step by step is also easy, no special skills are needed. You only need to prepare a few things. That is, the application recover your files and patience.

How to restore lost photos


is sometimes important, especially if the photo is a moment that cannot be repeated. For example, a photo with her lover? For those of you who want photos that have been deleted can come back again, can do some of the methods that will be explained below, see well.

#1: Using the Diskdigger photo recovery application


There are many photo recovery apps on playstore, this application is my mainstay. You could say this diskdigger photo recovery is the most powerful way to restore deleted photos on android the main focus of this application is to help restore deleted photos in internal memory.
So the first recommendation is to use this application The interface is easy to understand. The following guide returns the deleted photos using the Diskdigger photo recovery application:

First step:

Download the Diskdigger photo recovery application in the Play store. FYI. This application has downloaded 50 million users and has a 4.2 / 5


Second step Rooting:

Open the Diskdigger photo recovery application. In the main view this application provides 2 options, namely Basic scan (no root) and Full scan (root required).


For Androids that have not been rooted, you can use the Basic scan option. However, the scan will be limited to looking for deleted photos on android in the form of thumbnails.
Which means, the resolution of low quality photos.
Whereas if you want to recover deleted photos with good quality, you need root so you can use the full scan option Diskdigger photo recovery.

Third step:

Tap Basic scan and wait for the scanning process to complete. The duration of scanning depends on the number of photos on your android memory.
When finished, a notification will appear containing the number of photos that can be recovered. Don't be surprised if many photos appear from the gallery, because this displays all thumbnail thumbnails of photos.
To find the missing photos, you need to set the filter to estimate the date the photo was deleted.
Here's how to filter:


Fourth step:

Have you found the photo you are looking for? The last step, you only need to restore the deleted photo by pressing the Recover button.


#2: Using the photo recovery application


By using this application your photos will quickly fill up the Android you have.

Here's how:

Install the application by downloading it in Playstore for free
After it is installed, open the application by selecting
Secaar automatic start recovery , the application will display photos of photos that have previously been erased from your android

#3: Using the Restore Image Application


  • This is the second application that is recommended to restore deleted photos and you want to return. Consider the following steps:
  • Download the application at Playstore for free.
  • Then install the application until it's finished
  • Open the application and select the photo save folder that you want to return the photo to
  • Continue by selecting the photo you want to restore
  • Then select restore image
  • Your photo has returned to the storage folder


#4: Using the Photo Return Application

Same with how to restore deleted photos on android with other applications, this application can restore deleted photos. Check out the following:

  • Download and install the application that you already have
  • Open the application
  • Select the photo file you want to restore by selecting the restore photo menu
  • The step is complete, your photo has been saved again.

#5: Restore photos deleted without application


Well, for this one it's very special and easy, without downloading the application. but the tone must have a google account that is connected to image storage.

The photo recovery step can be done in the following ways:

  • Make sure your android is connected with email
  • Open the menu and select google photos
  • At the top left select the trash / trash menu
  • Find the missing photo, then click by holding it for a moment and then select the restore menu Automatically return your photo to the storage gallery
  • Google trash storage is only valid for 60 days, so you have to recover immediately after the photo is lost.
  • Step finished, good luck

Thus How to Recover Deleted Photos on Android that can be done with the application or not with the application. Hopefully this information helps you and is useful. Good luck.

IDM (Internet Download Manager) is one of the most widely used download applications from the past until now. Almost every laptop or PC that I found almost 90% used IDM as the main download manager application. The thing that causes why people prefer to use IDM even though there are still many download manager / file download applications that is due to the speed factor and also very simple.

With IDM we can download various types of files very easily. Call it for youtube videos. When playing youtube videos, the IDM popup menu will appear which allows us to download the video file and this is one of the excellent features of IDM and I like it myself.

Although IDM has a speed that is superior to other download managers, it turns out there are still some people who experience problems when using it, namely the download speed is very low and to download files requires a long time. And there are some cases where the internet connection is very fast and stable but when downloading using IDM the download speed is very slow.
Before we go to the stage of how to increase IDM speed , it would be nice to know in advance the causes of why IDM is so slow when downloading a file:

Internet connection


This is the main source of reasons why downloading browsing activities and others are interrupted. When the internet connection is very ugly and unstable, the download speed will be slow, even when using IDM.

Download File Server


This is still not widely understood. Every file that we will download like on google drive, dropbox, mediafire, tusfiles and others has different servers. This will affect our IDM download speed. If the location of the server is too far from our location, the download speed will be slow and if it is close it will have a better download speed.

Exposed to Speed ​​Limiter


Speed ​​limiter is one of the features that has long existed in IDM. The function of this feature will limit the download speed and there are some people who arbitrarily set this feature as a result the download speed is very slow even though the speed of the internet is very fast.

Using the wrong DNS


The activity of changing DNS (Domain Name Server) is one of the usual ways to speed up and stabilize an internet connection, but many people are wrong and carelessly use DNS as a result the DNS used actually slows down the internet speed. Use Google DNS and OpenDNS.

Downloading Streaming


Although this is rarely done, it can cause download speeds. Why is that ? This is due to the internet speed will be divided into 2 as a result when downloading files with IDM will feel slow. Therefore, do not get used to downloading files, especially video files on youtube while streaming. After paying attention to the things that caused the download speed of IDM above, you have read and understood, now we will go into the stage of how to increase download speed on IDM according to the title of this article. Alright without the need for lots of ado, see a short tutorial from Tekno Match below.

How to Increase IDM Download Speed


#1: Open the IDM application. Then click the Download tab menu


#2: In the Speed ​​Limiter speed section , set Turn Off . This is done if your Speed ​​Limiter is active.


#3: The next step is to click the gear Options icon


#4: Click the Connection tab then click on the Select your internet connection section.


#5: Select High Speed: Direct connection (Ethernet / Cable) / Wi-Fi / Mobile 4G / Other . then Last save changes by clicking OK.


This method is able to increase internet speed and has proven successful. Hopefully these tips can be useful for all of us.

What are the Latest Features of iOS 12?

Apple officially holds WWDC 2018 and with it there is definitely an announcement of the new
version of iOS, exactly iOS 12. In terms of the appearance of this version it is still the same as before, but a number of new features that it carries are interesting to highlight. Here are some of the latest features of iOS 12 along with a brief explanation.

More responsive performance

What are the Latest Features of iOS 12?

Compared to iOS 11, iOS 12 is believed to be far more responsive, even for devices that are old enough though. For your information, iOS 12 compatibility is exactly the same as iOS 11, which means that the device as old as the iPhone 5S can still receive updates when it is released in September or October. In testing using the iPhone 6 Plus running iOS 12, Apple said that the Camera application can be opened 70% faster, the keyboard appears 50% faster, and typing is also claimed to be more responsive. Apple did not forget to add that overall the application loading on iOS 12 can be doubled faster.

ARKit 2


Continuing the footsteps of ARKit 1.5 released with iOS 11.3, ARKit 2 continues to perfect the augmented reality experience that iOS 12. users can enjoy. Most importantly, AR content on iOS 12 can be enjoyed multiplayer, more or less similar to that presented by ARCore 1.2 on Android.
Then what is no less unique is the new AR file format called usdz which is the result of collaboration between Apple and Pixar. Thanks to usdz, AR content can basically be accessed directly from various applications such as Safari, Messages, Mail and News. Still around AR, iOS 12 also presents a new default application called Measure, which functions to measure the dimensions of various real objects around the user. Before this actually there have been several similar applications in the App Store from third party developers, but at least for simple measurements we can rely on this default application only.

Messages and FaceTime


Updates to these two applications are actually more funny than functional. Especially on the iPhone X, there are a number of new Animoji characters, along with options to create their own characters that Apple calls Memoji. Furthermore, Animoji can now also imitate the movements of users who stick their tongues. What might be more important is FaceTime, because in iOS 12, finally comes the Group FaceTime feature, aka group video calling. As many as 32 people can join in one FaceTime Group conversation, and of course this feature integrates with group conversations on iMessage.

Photos


The Photos application on iOS 12 brings a new tab labeled "For You" which combines Memories with iCloud Shared Albums. The search feature is also claimed to be smarter in Photos for iOS 12, and what is no less interesting is the sharing suggestion feature, which is very useful for exchanging collections of photos taken during activities with friends or family.

Grouped Notifications


After all this time, Apple finally fixes one of the weaknesses of iOS compared to Android, which is related to notifications. In iOS 12, notifications will now be grouped based on applications and topics, so users will no longer be greeted by a row of notifications that seem to have no end below. Also very useful is the ease of managing how notifications from each application will be displayed, whether it feels unnecessary and is better turned off completely, or displayed in the Notification Center without interrupting user activity.

Do Not Disturb and Screen Time


Regarding this interruption apparently got a large portion in iOS 12. Simply put, Apple wants consumers not to exceed the limits of gadget usage, and this they try to realize through the refinement of the Do Not Disturb feature and a new feature called Screen Time on iOS 12.
Do Not Disturb now has a mode specifically for sleep hours, where notifications that enter as long as it will be completely hidden, and will only be displayed in the morning. The hope is, users who wake up in the middle of the night then reflexively check the clock on their cellphones and then continue to open Instagram after seeing the number of incoming notifications, but can go back to sleep again.


Screen Time on the other hand will provide an overview of device usage in the hands of each user; how many times have we opened the cellphone every hour, and so on. From there we can choose to limit ourselves, such as limiting the use of the Instagram application to only one hour a day. The impression is like regulating the use of gadgets by children, but in reality some of us really need restrictions like this if we want to stay focused and productive. Of course the features presented by Screen Time can also be applied as parental control features for children.

Siri Shortcuts


Siri also gets an interesting update on iOS 12, where he can communicate with all third party applications, with the developer note already providing support. So with one voice command phrase from the user, Siri can instruct the application to do something on demand. This phrase can be made by ourselves, and the instructions are not limited to one. Everything can be arranged via a new default application called Shortcuts, which utilizes the drag-and-drop interface to make it easier for us to mix such serial instructions for Siri and various applications.

Improved application design and improvements to CarPlay


iOS 12 brings a new look to News and iBooks, which apparently changed its name to Apple Books. The Voice Memos application has also been enhanced in appearance, and for the first time, is available for iPad users. Likewise for the Stocks application that is now present on the iPad. For CarPlay, Apple seems to hear a lot of complaints from users. During this time, the car dashboard can only display navigation from Apple Maps if using CarPlay. Who also wants to use Apple Maps that is so inferior to Google Maps or Waze? Fortunately, CarPlay on iOS 12 has finally supported third-party navigation applications.