
![Learn How to Create a Password Protected PDF File in Microsoft Word 2013 [Full Tutorial], Creating a Password protected pdf file in microsoft word 2013, create pdf password protected in ms word 2013 or other versions, how can i make my pdf password protected, i want to make my pdf password protected, i want to lock pdf files via password, how can pdf get password protected, protect your important pdf through a password, Learn How to Create a Password Protected PDF File in Microsoft Word 2013 [Full Tutorial] By XPCMasti.blogspot.com](https://blogger.googleusercontent.com/img/b/R29vZ2xl/AVvXsEjSKhyT1-zw0NNDCzguMLzHvh7FVc5HUvqhLtrkemws8gldKQ5E8QGF6fmD4rtVdoPD2Q_OSm1S0oVM0a2xt6ijdooKbo0xgDDoCkkiZU18vQ6b7bOQYITqoA_MYgFzVdzMQvudsB6tExnJ/s1600/Create+Password+Protected+PDF+in+Word+2013+%255BFull+Tutorial%255D+By+XPCMasti.blogspot.com.png "Learn How to Create a Password Protected PDF File in Microsoft Word 2013 [Full Tutorial] By XPCMasti.blogspot.com")
Learn How to Create a Password Protected PDF File in Microsoft Word 2013 [Full Tutorial]
 PDF files are considered the world's safest file formats. The popularity of the world that all official government documents are only available in the same format. The reason is simple. PDF is not easy to change the document and makes it look like the owner of the computer, look at the same document to the receiving computer. Whether the master document they can copy text from the document or print it to the receiver. So there are several features that make it the favorite PDF document format. One such feature is also protected by passwords.
To create a PDF document usually carried out using virtual printers, or other third-party software. The Microsoft Office 2007 and all versions of the facility after that you can directly convert your Office documents to PDF. But also to create PDF documents in Microsoft Word 2013 and there is a support facility to change them, there are many people that just PDF files password to the features that are not familiar available. This will be explained in detail in this tip.
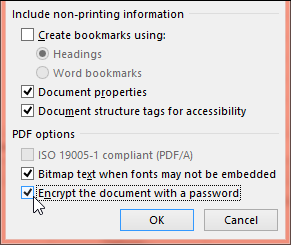
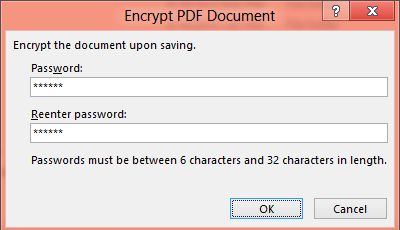
The aim is to change your password to open the PDF document and set a password. Now open the File menu and choose Save As to this. You come from a PDF, you will be asked to choose where to save the password for Protected Files. Computer Required to pick up on the drive and folder. Now you go to the Save as type: drop-down list in the dialog box and choose PDF from here. Here, an Options button displayed in front of you, click on it. When the dialog box appears in front of you, you will see that the last option Encrypt the documents with a password checked the checkbox. In the next dialog box opens, you have to write a password, and then type the password again, and then OK. Now, as the last step you name your file and then save.
Here's the screenshot:
Good Luck.

Post A Comment:
0 comments so far,add yours