If you are used to doing some late night work for long hours in front of your computer, you may have realized that the pressure on your eyes is real. In order to counter this, you probably have used f.lux on Windows, and if you are a users of YOS or Mac, you probably used the night shift. With the release of Windows 10 Creators Optite again in April, Microsoft has made it much easier by pushing out a neat new feature called Night Light, which aims to reduce the eye strain used by filtering the blue light emitted from the screen. The right feature was built in Windows 10 and works better than f.lux. So, without further ado, let's take a look at how to set up and use Night light in Windows 10:
Enable Night Light in Windows 10
Night light can be easily enabled in Windows 10 settings. Just follow these steps to turn it on:
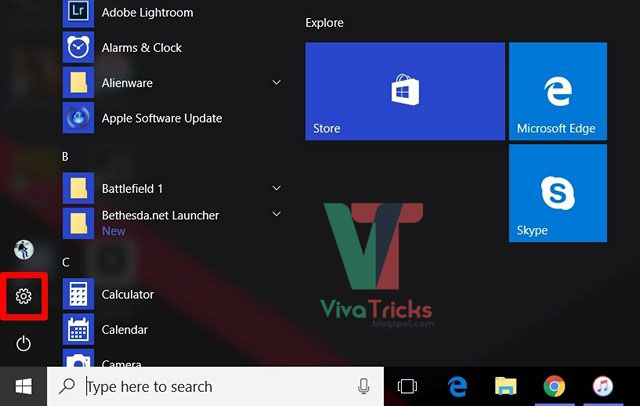
#1: Go to Start Menu and click on the gear icon, so that you can go to "Settings".
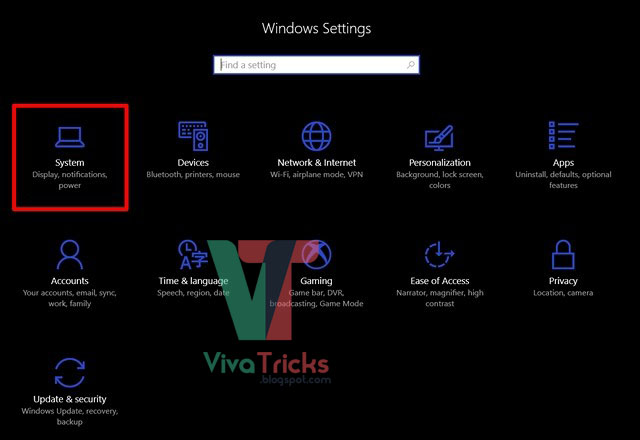
#2: Now, click on the "System" section to go to System settings.
#3: Once you’ve entered System settings, you’ll be able to turn ON Night light in the "Display" section.

Customize and Schedule Night Light
The night light, by default, is set to turn automatically by sunset and turn off before sunrise depending on your area. Also, there is preset color temperature for night light. However, you can easily change these settings according to your preferences simply by following these steps:
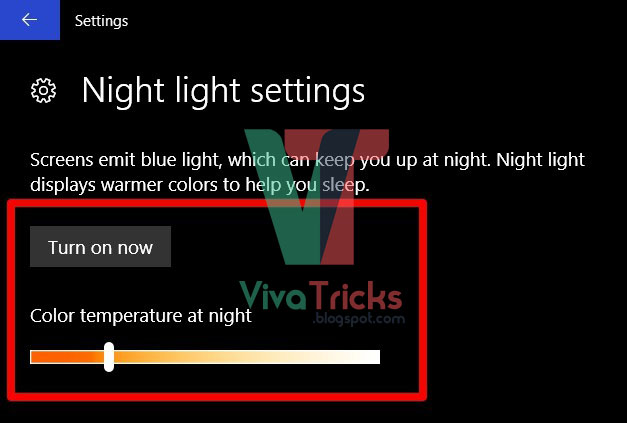
Go to the "Night Light Settings" right below to customize it according to your preferences. You will notice the slider to adjust the night color temperature completely according to your preferences, so this will be the color temperature that will be used, next time when the night light is turned on. You can also turn on the night light immediately, without waiting for the preset time by clicking "Turn on Now".
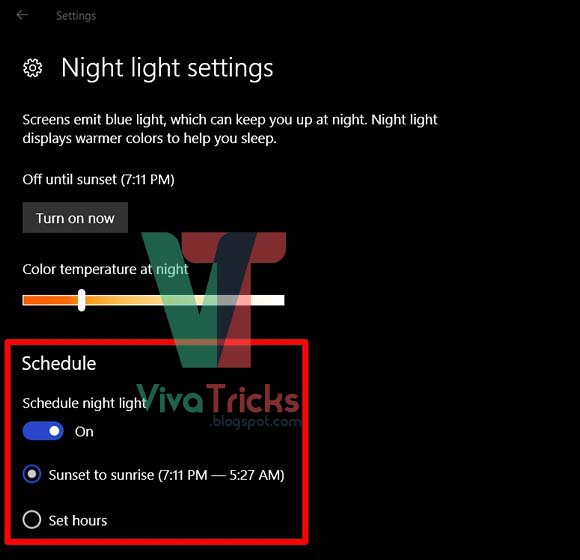
There is a light night schedule option as well. If you want to disable scheduling completely, you can turn it off by moving the slider. If you want to customize the schedule according to your needs, click on "Set Hours" and simply choose your pet turn and turn off time.
Well, that's pretty much it, as now the night light will automatically turn off as per your preset interval. When the night light is turned on, you will see a warmer warmer color attaching, which emits a blue light from the screen and is much easier on the eyes.
Avoid Eye Strain With Night Light on Windows 10
Night light is Microsoft's attempt to help people come out, to reduce the pressure on their eyes because of long hours of use in front of their computers especially during late at night. It works like a charm, as you expect and it is now up to you to take full advantage of what Microsoft has to offer. We strongly recommend you to keep this feature enabled on your system. So, have you ever used the night light feature on your Windows 10 machine? Let us know what you think about this neat feature simply by dropping a few words in the comments section below below.